
A customer’s timeline brings together the notes and activities linked to their record, so a colleague with the right access can pick up where you left off. Activities include tasks, calls, appointments, emails and texts; notes keep written information.
The timeline is not an audit trail of every change. For an introduction to records, forms and how links work, see Understand the basics: records, lists and timelines.
Add to the timeline
- Open the account or contact.
- On the timeline, click the + icon.
- Choose what to add. Under Activities there are Appointment, Email, Phone Call, Task and Text. Under Notes there is Note.
- Fill in the form and save.
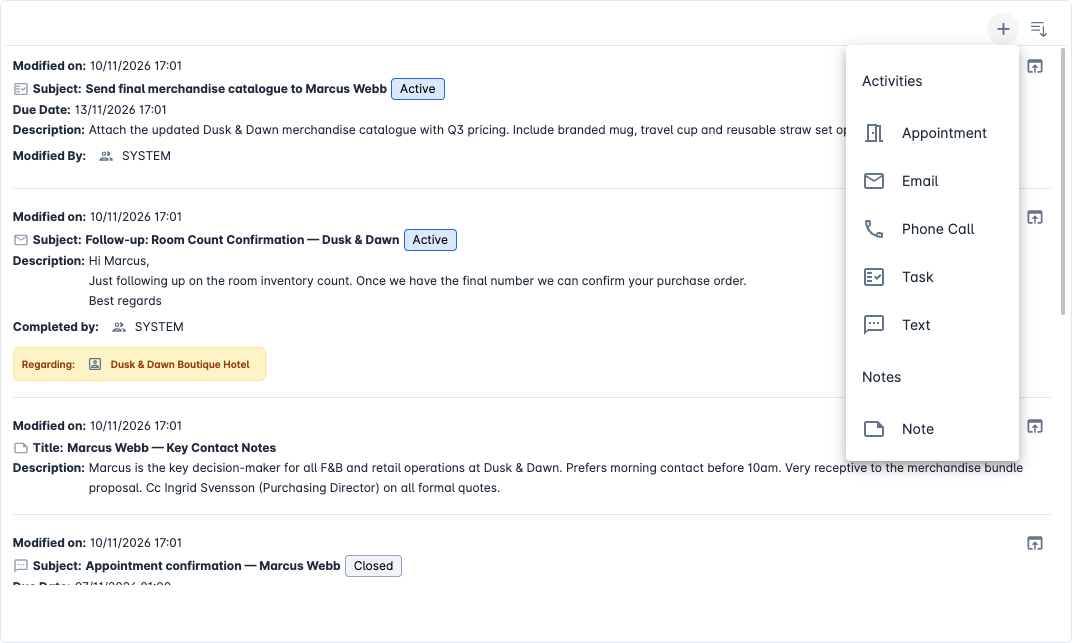
A second icon next to + changes the order of the timeline. Each entry has an open icon to see it in full. Email and Text only appear in the menu if the record can be emailed or texted.
Notes, tasks, calls and appointments
These open a short panel on the side.
| Type | Required | Other fields |
|---|---|---|
| Note | Title | Description |
| Task | Subject | Description, Due Date, Duration, Priority |
| Phone Call | Subject | Description, Due Date, Duration, Priority |
| Appointment | Subject | Required Attendees, Optional Attendees, Location, Online Meeting, start and end dates, All Day Event, Duration, Description, Priority |
The Regarding field answers "What is this about?" and links the entry to the record it concerns. When you add it from a customer’s timeline, the customer is filled in for you. It is separate from a message’s recipient: To says who receives the message; Regarding says which record it concerns. See Linked records and Regarding.
Click Save and Close, or Save and Create New to add another.
Where an entry appears
A note appears only on its Regarding record. An activity can also appear on the timelines of records selected as recipients or attendees, provided their record types have activities enabled. Internal user records do not receive timeline entries.
For example, an email regarding a quote and addressed to a contact appears on both the quote and contact timelines. It also appears on the timeline of the account or contact selected in the quote’s Regarding field. It is the same email, so its status changes everywhere when it is sent or fails.
When you save changes to Regarding, recipients or attendees on an editable activity, Linx adds and removes its timeline links to match. A record still linked in another field keeps the activity: removing a contact from To does not remove it from their timeline if they remain in Cc. Clearing an attendee or recipient list removes that list’s links.
An account or contact timeline also brings together activities whose Regarding record is one of its opportunities, quotes or invoices:
- An opportunity links to the account or contact through Customer, Parent Account or Parent Contact.
- A quote or invoice links to the account or contact through its own Regarding field.
This works upwards only. A general account email does not automatically appear on every opportunity, quote or invoice for that account. A record explicitly selected as a recipient or attendee still gets its own activity link. Notes remain on their direct Regarding record; leads, sales orders and arbitrary chains of linked records are not included in this customer rollup.
Linx reads the current customer links when you open the timeline, rather than copying activities. Changing an opportunity, quote or invoice’s customer link changes where its earlier activities appear the next time the timeline is loaded. It does not change the activity’s own Regarding or recipient links. An entry matching more than one route appears only once.
You need Read access to the customer and activity. To see an activity through this customer rollup, you also need Read access to the opportunity, quote or invoice it concerns, within your role’s record scope.
Creating a lead or opportunity does not itself add a timeline event. Linking an activity also does not grant permission to read it.
Read business events
Linx records three milestones automatically when the corresponding business action succeeds:
| Entry | When it is recorded |
|---|---|
| Lead qualified | A lead becomes Qualified, after any customer records and the opportunity have been created successfully. |
| Opportunity won | An opportunity becomes Won, including when creating an order from a quote successfully closes its originating opportunity. |
| Opportunity lost | An opportunity becomes Lost. |
These entries show System event, Occurred on, By and Source. The actor is the person under whose account the operation ran; System event does not mean that no person initiated it. You cannot edit, complete, send, schedule or individually delete these entries, and there is no activity form to open.
Each event is linked to its originating lead or opportunity and the records selected in Customer, Parent Account and Parent Contact after the action, where those record types have activities enabled. Qualification therefore includes newly created customers. A record selected in more than one field receives just one entry; internal user timelines remain excluded.
These are historical links captured when the event happens. Later changing the customer does not move an earlier event to another customer. This differs from the current-relationship activity rollup described above. Deleting the originating lead or opportunity removes its events and their links too; deleting only a linked customer removes that customer’s link.
You need Read access to the timeline record, activities and the source lead or opportunity within your role’s record scope. Open or reload the customer’s timeline to see newly recorded events. Repeating an already completed action or merely changing its status reason does not add another milestone. Existing and sample-data statuses are not reconstructed into historical events.
When related records are deleted
When a record can be deleted, its notes and activities that directly Regard it are deleted too. The same applies to activities that name it as a recipient or attendee: deleting a contact can delete the whole email or appointment, not just hide it from that contact’s timeline. Existing reference checks and delete permissions can block the operation.
Business events follow their source instead: deleting the originating lead or opportunity removes the event and all its timeline links. Deleting a secondary linked customer removes only that customer’s link, leaving the event on its surviving source.
Each record deletion is all-or-nothing. If a related entry cannot be deleted, earlier cleanup for that record is rolled back too. Bulk deletion handles each selected record independently, so a blocked record stays intact while other permitted deletions can succeed. Stored-file cleanup is queued only after the deletion commits.
Work with tasks
A new task is Open, with a reason of Not Started, In Progress, Waiting or Deferred. In the record toolbar:
- Mark Complete finishes the task.
- Close Task asks whether it was Completed or Canceled.
Completed and canceled tasks cannot be edited. On the timeline, a task whose due date has passed shows Overdue in red.
Send an email
- Choose Email from the + menu. A full form opens with Regarding and To filled in if the customer has an email address.
- Check From (it is you by default), To (required), Cc, Bcc, Subject (required) and the message. Add attachments if you need them.
- Use Template or Signature in the toolbar to insert a saved template or your signature. They only show if some exist.
- Click Send.
Linx sends the email in the background, so the status moves from Draft to Sending to Sent. If it fails, the status becomes Failed and a red banner explains why. On a new account, Linx tells you straight away when you click Send that email has not been set up yet. See Set up email and text messages.
Send a text message
- Choose Text from the + menu.
- Enter To (required), a Subject and the message. Use Template for a saved message.
- Click Send.
The text goes to the customer’s Main Phone and uses text credits. See Set up email and text messages to turn texting on and buy credits.